












 About us
 Magazine
 Contact





Did you know that according to recent analysis, over 75% of all campers at European campsites show up in the exact same manufacturer white? You’ve surely experienced this: after a long day in nature, you look for your van and suddenly find yourself in front of a wall of identical vehicles. The standard design often looks sterile and uninviting, yet the fear of paint damage or costs of over 3,500 euros for professional work keeps many from making a change.
At Campidoo, we fully understand that your vehicle is more than just a means of transport; it is your home on wheels and an expression of your freedom. In this article, we show you how to use the right film not only to create a real eye-catcher but also to effectively protect the original paint at the same time. We have compiled the best motorhome wrapping photos for 2026 to inspire you for your own project. You will learn how to use high-quality furniture films in the interior to ensure maximum coziness and which designs best enhance your camper. We also take a look at the real costs and provide you with a clear roadmap for your individual design.
Key Takeaways
- Let yourself be inspired by current trends like nature motifs and modern minimalism to give your camper a very personal touch.
- Learn how to find the perfect design through inspiring motorhome wrapping photos and which colors best suit your individual adventure style.
- Understand the crucial material differences between weather-resistant exterior film and tactile furniture film for an all-around cozy interior.
- Use our practical DIY checklist including tool tips so that you can easily achieve bubble-free application of your films and stickers.
- Get a clear overview of costs and durability so that your mobile home continues to shine reliably in all weather conditions for years to come.
Motorhome Wrapping Photos: Inspiration for Your Mobile Home
You are scrolling through Instagram or Pinterest and suddenly stop. A camper van in matte sage green or an overcab model with huge, minimalist mountain silhouettes captures your attention. Such motorhome wrapping photos are far more than just pretty pictures; they are the ignition key for your own design project. They help you get a real feel for proportions and long-distance impact. Colors look completely different on the huge side surfaces of a camper than they do on a small color fan at a hardware store.
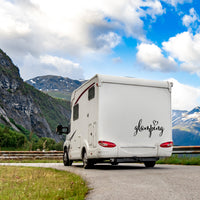
Psychology plays a crucial role in your well-being while traveling. Blue and turquoise tones radiate deep calm, which is ideal if you prefer heading to lonely coasts. A bold orange or warm earth tones, on the other hand, awaken the spirit of discovery and immediately provide a 100 percent adventure feeling. Before you commit, you should clarify how much film you want. A full wrap covers your vehicle completely and offers maximum protection. A partial wrap focuses on striking areas like the hood or side panels. Accents in the form of stripes or logos can often be implemented even on small budgets, yet they massively change the look of your camper.
When interpreting Pinterest photos for your project, be sure to pay attention to the lines. A design that looks harmonious on a flat VW bus can look completely misplaced on a rugged Sprinter with high beads. Use the photos as a rough guide, but adapt the geometry individually to the edges of your vehicle.
Why wrapping is worth it more than ever in 2026
Film technology has made enormous leaps in recent years. Modern high-performance films now block up to 99 percent of harmful UV radiation. This protects your camper's original paint from fading and from fine scratches caused by branches for a period of 5 to 10 years. This is an unbeatable advantage, especially for leased vehicles, as you can remove the film without residue before returning it. Under the protective layer, your camper remains practically in new condition, which stabilizes the resale value. Instead of the typical white mass-produced product from the assembly line, you drive a true one-of-a-kind vehicle that is immediately recognizable as your home at every campsite.
The most popular image categories for camper designs
While researching motorhome wrapping photos, you will quickly notice that three styles dominate the scene. Each category conveys its own message:
- Landscape motifs and mountain silhouettes: They are the absolute classic. These designs visually connect your vehicle with the environment and reflect the longing for the peaks.
- Geometric patterns: Clear lines, triangles, or honeycomb structures in a "vantastic" style look modern and technical. They emphasize the vehicle's dynamics and often look more professional than playful graphics.
- Retro looks: Two-tone wraps in pastel shades like baby blue or mustard yellow evoke the freedom of the 70s. This fits perfectly with vintage vehicles, but also visually enhances modern camper vans.
Regardless of which style you choose, wrapping is the most personal upgrade you can treat your camper to. It turns a utility vehicle into your very own individual expedition vehicle.
Popular Styles and Trends: From Nature Motifs to Modern Minimal
Your camper is more than just a vehicle; it is your home on wheels and an expression of your personality. In the 2026 vanlife community, we see a clear shift away from standardized designs. Current data shows that around 65% of owners prefer individual designs to stand out at the campsite. A particularly strong trend is the play with surface textures. The combination of deep matte base films and glossy accents creates an impressive sense of depth. When you look at motorhome wrapping photos, you often notice how light edges are emphasized by this contrast.
Thanks to modern digital printing technology, there are no limits to your imagination. Photorealistic prints of your own travel memories can now be realized at a resolution of up to 1440 dpi. This way, the silhouette of your favorite bay or the mountain range from your first Alps trip becomes an integral part of your vehicle design. Minimalist accents like compass motifs or stylized world maps remain classics in 2026 for expressing wanderlust and a sense of adventure without visual overload.
Pure nature: Mountains, forests, and compass designs
Nature motifs create a harmonious connection between your camper and the surroundings where you prefer to park. Large mountain panoramas have their best impact on the rear side panel, as they take advantage of the entire vehicle length there. Make sure the peak lines do not collide with windows or ventilation grilles. If you want to start small, motorhome stickers & decals offer an excellent way to set targeted accents without wrapping the whole vehicle right away. A well-placed compass on the rear immediately signals: An explorer is on the road here.
Modern & Clean: Geometry and subtle lines
Minimalism is synonymous with modern travel comfort in 2026. Geometric shapes and clear lines are not just aesthetic; they massively influence the perception of your camper. Horizontal lines can visually stretch a compact camper van by up to 20 cm, while diagonal accents add dynamics. Earthy tones dominate the season in terms of color. Sage, sand, and anthracite are the favorites because they make dirt and dust significantly less visible than classic white. This functional minimalism ensures that your van always looks well-kept. To ensure the interior of your camper remains just as well thought out as the exterior design, you will find suitable clever organizational systems for your next adventure with us.
- Sage: Has a calming effect and blends perfectly into forest landscapes.
- Sand: Ideal for beach lovers and extremely easy to maintain against desert dust.
- Anthracite: Gives your motorhome a classy, masculine off-road look.
Exterior Wrapping vs. Interior Wrapping: Where to Start?
Standing in front of your camper wondering where to make the first cut? The decision between exterior and interior wrapping depends heavily on your primary goal. Do you want to increase the resale value of your vehicle through paint protection, or do you finally want to feel truly comfortable in your mobile living room during rainy weather? The fact is: both variants pursue completely different approaches in terms of material and application.
While the exterior film acts as a shield against stone chips, UV light, and road salt, the interior is all about pure aesthetics and homeliness. The material differences are enormous. For the exterior, thin, highly flexible polymer films of 70 to 100 micrometers are usually used. These must easily withstand temperature fluctuations from minus 40 to plus 110 degrees Celsius. Indoors, however, we use special furniture films that are up to 300 micrometers thick. This layer thickness allows for realistic embossing, so a stone-look film actually feels like cold slate.
If you are looking at cost-efficiency, interior wrapping often offers the greater "wow" factor on a smaller budget. With a material investment of about 250 to 450 euros, you can transform a worn interior into a modern loft. A professional full wrap on the outside, by contrast, can quickly cost between 3,500 and 6,000 euros, but it offers ultimate protection for the original paint.
The exterior: Protection meets aesthetics
A partial wrap is the ideal entry point if you don't want to use up your entire budget right away. Often, it is enough to wrap about 30 percent of the vehicle surface to achieve a completely new effect. Focus on striking lines or the hood. Beads, edges, and plastic parts require special attention. These areas are often the highlights when searching for motorhome wrapping photos, but they require craftsmanship and an adhesion promoter (primer). For in-depth planning, be sure to check out our pillar guide on wrapping, which summarizes all technical details for 2026.
The interior: Homeliness through furniture films
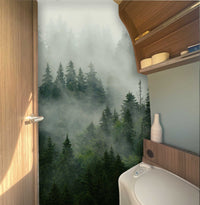
In the interior, your camper is your creative playground. Old, yellowish wood decors disappear under tactile films that imitate leather, textile, or even concrete. The DIY potential here is extremely high since you work in a controlled, dust-free environment. Especially in the camper kitchen and bathroom, modern films set accents that will amaze every guest. If you look at current motorhome wrapping photos, you will notice that matte surfaces in combination with wood-structure films lead the trend for 2026.
- Exterior: Focus on UV protection and weather resistance (polymer film).
- Interior: Focus on haptics and scratch resistance (textured furniture film).
- Time required: Interior is usually a weekend project; exterior often takes professionals 3 to 5 working days.

DIY Checklist: How to Apply Film and Stickers Yourself
You've found the perfect motorhome wrapping photos for inspiration and now want to lend a hand yourself? It's absolutely doable. With a little patience and the right plan, you can turn your vehicle into a true one-of-a-kind. While a professional full wrap often costs between 3,000 and 5,000 euros, you save a massive amount of your travel budget with a DIY project. To ensure the result looks professional, the right preparation is crucial.
Perfect cleaning as the foundation
A clean surface determines success or frustration. Never use glass cleaner or standard dish soap. These products often contain moisturizing agents or surfactants that can reduce the glue's adhesive strength by up to 35 percent. Reach for isopropanol or a special silicone remover instead. If your camper has been standing under trees, you must first remove resin from the car, because even the smallest residues under the film will look like ugly pimples later. The surface must be absolutely dust-free, dry, and grease-free.For a clean result, you need the following tools:
- Squeegee: Use a squeegee with a felt edge to avoid scratching the film surface.
- Heat gun: A normal hair dryer is usually not enough, as we need temperatures of around 80 degrees for final fixation (tempering).
- Cutter knife: Use sharp 30-degree blades for precise cuts along seals and edges.
- Masking tape: Ideal for fixing and marking the position.
Step-by-step to your first sticker
Before peeling off the backing paper, position your design on the vehicle with masking tape. Measure the distances to windows or trim pieces exactly so that nothing looks crooked later. You have two options for application. Wet application is ideal for beginners on large surfaces, as you can still shift the film on a water film. Modern films with air channels, on the other hand, are applied dry. In this case, the air escapes through tiny channels in the adhesive layer, which almost completely prevents bubbles from forming.
When using the squeegee, always work from the center outwards. Apply even pressure to squeeze the air out from under the film. A common mistake is the wrong ambient temperature. Never apply your film in direct sunlight or below 12 degrees Celsius. The ideal range is between 18 and 23 degrees. Finally, tempering follows: carefully heat the edges and curves with the heat gun. This step releases the film's "memory" and ensures that it does not contract again during the heat of summer.
Once your camper shines with new splendor on the outside, the interior should keep up. Find the suitable Campidoo organizational systems now to perfectly organize your newly designed camper.
Costs, Durability, and Maintenance: Your Path to the Perfect Camper Look
You have now seen many inspiring motorhome wrapping photos and are surely wondering what it costs to make your dreams a reality. The price range is as individual as your travel style. A small accent or a subtle logo on the back starts at around 20 euros. However, if you are planning a complete full wrap for a large motorhome, the costs can quickly rise to up to 4,000 euros. Most campers opt for a partial wrap, which often costs between 800 and 1,800 euros and already makes a huge visual difference.
Durability and weather protection
Quality pays off, especially if you often park in sunny regions. A high-quality film has a lifespan of about 5 to 7 years. To ensure that the colors of your motorhome wrapping photos do not fade in reality, professionals use special protective laminates with an integrated UV filter. This layer preserves the design from aggressive radiation and mechanical influences. If a stone chip should happen to cause a small mark, the affected element can usually be replaced individually without having to re-wrap the entire vehicle.
For the splendor to last a long time, the right care is crucial:
- Prefer hand washing: The hard brushes in automatic car washes can loosen the edges of the film over time.
- Keep your distance: Use the high-pressure cleaner only at a distance of at least 50 centimeters and never aim directly at the film edges.
- Use special cleaners: Avoid aggressive solvents; mild shampoos preserve the shine or the matte finish much better.
Cost-benefit check for your budget
Trying to save 300 euros with cheap film from the internet often ends in frustration. These films are usually very difficult to work with and, after a few years, can only be removed in tiny scraps. Brand-name films from manufacturers like 3M or Avery Dennison, on the other hand, guarantee residue-free removal. This is a huge advantage for the resale value of your camper. If you are unsure whether you can wrap an entire surface without bubbles, visiting a professional wrapper is advisable. They usually offer a 2-year warranty on their work. For all DIY fans who want to start small, we offer the perfect solution. Discover our motorhome stickers for your next project and start with a design that fits your next trip perfectly.
Your path to the individual dream camper 2026
You have now seen how diverse the design possibilities are for your mobile home. Whether modern nature motifs or minimalist accents; the right motorhome wrap images show you the way to a vehicle that perfectly reflects your personality. A high-quality wrap protects your paint from UV rays and scratches for over 7 years, while you can freshen up the interior in just a few simple steps. The application is easier than you might think if you rely on the right material.
At Campidoo, we know exactly what matters because our products are developed by campers for campers. Our UV-resistant materials withstand extreme temperatures from minus 40 to plus 80 degrees Celsius and can be applied completely bubble-free thanks to special air channel technology. This saves you hard cash, as you don't need expensive professionals for the installation. Rely on quality that has been mastering the tough everyday life on the road for years.
Give your camper the perfect look now with our stickers!
Your next adventure is already waiting for you; get your van ready for the season and enjoy the freedom in a design as unique as your travel destinations.
Frequently asked questions about your camper design
What does a complete motorhome wrap cost on average?
A full wrap costs about 2,500 euros for a compact van, while large fully integrated models often have to budget up to 6,000 euros. The price is composed of about 40 percent material costs and 60 percent pure labor. Since thorough pre-cleaning and the removal of attachments such as handles or lights are time-consuming, you should definitely plan for this buffer. High-quality films from manufacturers like 3M guarantee a result that still looks like new even after years.
Can I clean my wrapped motorhome in a normal car wash?
You can clean your wrapped vehicle in a textile car wash, provided you avoid programs with hot wax. Brushes made of hard polyethylene are off-limits, as they leave fine scratches on the surface and make the design look dull. Use facilities with soft-care elements instead and keep a minimum distance of 50 centimeters from the edges with the high-pressure cleaner. This effectively prevents the film from peeling off at the corners due to water pressure.
How long do the images and colors on the film last before they fade?
High-quality films last on average 5 to 7 years before the first visible signs of fading due to UV radiation occur. On vertical side surfaces, color brilliance is often maintained longer than on the roof, which is directly exposed to the sun. If you look at different motorhome wrap images for inspiration, look for designs with an additional protective laminate. This laminate blocks up to 90 percent of harmful rays and preserves color depth over a long period.
Can the film really be removed without residue after years?
Yes, brand-name films can be peeled off the original paint within 5 to 10 years without adhesive residue. A prerequisite for this is undamaged factory paint and the right technique using hot air at a temperature of about 40 degrees Celsius. If your camper is older than 12 years or has been repainted, the adhesion of the paint may be weaker. In 95 percent of cases, however, the paint under the film remains in absolute new condition, which increases the resale value.
Does a wrap or a color change need to be entered in the vehicle documents?
In Germany, you do not have to have a change of vehicle color due to wrapping entered in the registration certificate part I. There is no legal obligation for this administrative step, as the film is considered a temporary visual measure. However, be sure to inform your insurance company about the increase in value of your camper due to the new design. In the event of an accident, many tariffs only cover the costs of renewing the wrap if an added value of 500 to 2,000 euros has been registered in the contract.
Can you also wrap over windows and plastic parts?
Windows can be covered with special perforated film, while rough, unpainted plastic parts are unsuitable for conventional films. The perforated film requires an operating permit and may only be applied to the rear windows from the B-pillar onwards so as not to endanger visibility. Since unpainted plastic skirts offer hardly any hold for the adhesive, these areas are left out in 90 percent of all professional projects. Only special adhesion promoters help here, but they make the later removal of the film much more difficult.
What temperature is ideal for applying motorhome stickers yourself?
The ideal temperature for applying stickers is between 15 and 25 degrees Celsius in a wind-protected environment. If the thermometer drops below 10 degrees, the adhesive becomes brittle and does not form a permanent bond with the surface. At temperatures above 30 degrees, the material expands too much and unsightly bubbles form when squeegeeing. It is best to plan your DIY project for a dry morning in spring so that your design adheres perfectly to the metal.
Does the film actually protect the motorhome from hail or stone chips?
A standard film reliably protects the paint from stone chips and scratches from branches, but offers no protection against hailstones larger than 2 centimeters. For real impact protection, you would have to choose a special paint protection film that is significantly thicker than normal decorative film at 150 to 200 microns. Many campers use motorhome wrap images as a template to double-protect particularly vulnerable areas such as the front section or wheel arches. This saves the bodywork from expensive paint damage on your travels.

